If you are a blogger, then you will need to add a table to your blog post. If you are a new blogger, and you don't know how to add a responsive table, then no problem. Today this is what we are saying in this post. You will get full information about Responsive Table in this post.
Many times we write such articles on our blog posts, which require a table. And due to new blogger Lack of Knowledge, they put any table in their post. Many bloggers create tables from MS Word and add them to their posts. Which is not responsive at all.
If you do this too, then understand that your post will not be responsive. And in this case, the loading speed of your blog post will decrease. It will take time to open the post. Which has a bad effect on SEO. And the visitors are reduced. So that's why you don't make such a mistake at all. Today, in this post, how do we add Responsive Table to our blog post. Telling about it.
What is a responsible table?
Responsive Table means a table that is Device Friendly, that means if you open it in the mobile, then the table opens like a mobile. And if open in laptop or PC, then open in desktop mode. And open on Tab or Mac Notebook Tab, then open in Tablet Mode. In this way, all tables that are Mobile Friendly or Multi Device Friendly are responsible tables.
Due to Responsive Table our post or article looks very beautiful and attractive. On the other hand, if you set a normal table, then the laptop or computer will open correctly, but the contents of your table will be cut in the mobile. They will not open properly. Which spoils the User Experience on our blog. And the visitors start decreasing.
How To Add Responsible Table On Blogger ?
- Go To Blogger >> Select Theme >> Select Edit HTML.
- Click anywhere inside the code area and press Ctrl + F keys to open the search box.
- Now, Search for ]]</b:skin> tag and paste below code just above of this tag.
/* CSS Post Table */table{border-collapse:collapse;border-spacing:0;}.post-body table td {border:1px solid #e9e9e9;padding:10px;text-align:left;vertical-align:top;}.post-body table th {border:1px solid #e4373d;padding:10px;text-align:left;vertical-align:top;background:#e0262c !important;color:#fff}.post-body td, .post-body th{vertical-align:top;text-align:left;font-size:13px;padding:3px 5px;}.post-body th{background:#fff;font-weight:400;text-transform:uppercase;font-size:14px}table {max-width:100%;width:100%;margin:1.5em auto;}table.section-columns td.first.columns-cell{border-left:none}table.section-columns{border:none;table-layout:fixed;width:100%;position:relative}table.columns-2 td.columns-cell{width:50%}table.columns-3 td.columns-cell{width:50%}table.columns-4 td.columns-cell{width:30%}table.section-columns td.columns-cell{vertical-align:top}table.tr-caption-container{padding:4px;margin-bottom:.5em}td.tr-caption{font-size:80%}.post-body td img, .post-body th img {list-style:none;max-width:100%;height:auto;padding:0 !important;margin:0 !important}.post-body table.tr-caption-container img, .post-body table.tr-caption-container img, .post-body img {list-style:none;max-width:100%;height:auto;padding:0 !important;margin:0 !important}.post-body img {width:100% !important;max-width:100% !important;height:auto !important}.post-body table.tr-caption-container td {border:none;padding:0 !important;margin:0 !important}.post-body table caption{max-width:100%;height:auto;border:none !important;padding:0 !important}
- Click Save Theme.
- Open Blogger Dashboard And Open The Post In Which You Want To Add Table.
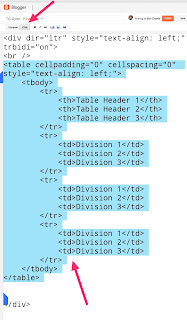
- Now Go To HTML >> And in the post where you want to place the table, paste the code below.
<table cellpadding="0" cellspacing="0" style="text-align: left;">
    <tbody>
        <tr>
            <th>Table Header 1</th>
            <th>Table Header 2</th>
            <th>Table Header 3</th>
        </tr>
        <tr>
            <td>Division 1</td>
            <td>Division 2</td>
            <td>Division 3</td>
        </tr>
        <tr>
            <td>Division 1</td>
            <td>Division 2</td>
            <td>Division 3</td>
        </tr>
        <tr>
            <td>Division 1</td>
            <td>Division 2</td>
            <td>Division 3</td>
        </tr>
    </tbody>
</table>
- Replace "Table Header" "Division" with the Text want to share.
- before publish your post see a preview of your blog post.
- If preview is correct then simply publish it.


